2019年10月07日
スニペットフィールドを使ってリンク入力欄(複数)を作成する
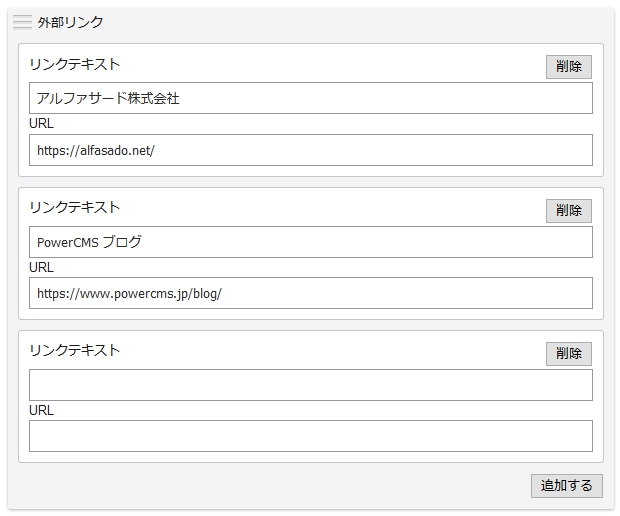
完成イメージ
記事編集画面に次の様なフィールドを作成するのが本記事のゴールとなります。
機能としては下記要件を満たしたものを作ります。
- リンクテキストとリンク URL がセットになった入力欄を作成
- 入力欄は追加する事が出来る
- 入力欄数の上限はなし ( JavaScript によって入力欄を増減 ) [1]
さて、それでは実際に作成していきましょう。
- ステップ 1. カスタムフィールドを作成
- ステップ 2. 入力画面用のテンプレートモジュールを作成
- ステップ 3. フロント用のテンプレートモジュールを作成
- ステップ 4. 記事アーカイブテンプレートに作成したテンプレートモジュールをインクルード
※ 本記事の動作確認は執筆時点で最新の PowerCMS 5.12 で行っております。
ステップ 1. カスタムフィールドを作成
先ず、何は無くともカスタムフィールドを作成します。
「既定値」には編集画面用のテンプレートを記入するのですが、今回はそこそこの行数となります関係で別途テンプレートモジュールを作成してインクルードする事にします。
| 項目名 | 設定値 |
|---|---|
| システムオブジェクト | 記事 |
| 名前 | 関連リンク |
| 種類 | スニペット |
| オプション | customfield_entry_outerlink_title,customfield_entry_outerlink_url |
| 既定値 [2] | <mt:Include module="cf-entry_outerlink" blog_id="1" /> |
| ベースネーム | entry_outerlink |
| テンプレートタグ | entry_outerlink |
ステップ 2. 入力画面用のテンプレートモジュールを作成
複数の値を持つ入力欄を作成する場合、ユーザーガイドには次のように記載されています。
複数の値を持つ入力欄を作成する
例えば複数選択可能なチェックボックスなど、同じ name 属性の input 要素を指定することができます。
下記は複数選択可能なチェックボックスのテンプレート (既定値欄に入力するテンプレート) の例です。name 属性値に「_loop」を付け加えた名前のループ変数を MTLoop ブロックタグでループして snipet_option という変数で値を受け取ります。『PowerCMS ユーザーガイド』(PDF) より
今回実装する上でのポイントは『同名の name 属性を持つ <input type="text"> 要素を複数用意し、一つのオプションに対して複数の値を保存する』ところにあります。
cf-entry_outerlink テンプレートモジュール
入力画面用のテンプレートでは、入力欄の HTML と CSS 、そして JavaScript による入力欄を増減する機能を記述しています。
| テンプレート名 | cf-entry_outerlink |
|---|
<div class="customfield_entry_outerlink-content">
  <mt:LocalVars>
    <mt:SetVar name="titles">
    <mt:Loop name="customfield_entry_outerlink_title_loop">
      <mt:SetVarBlock name="titles" function="push"><mt:Var name="snippet_option"></mt:SetVarBlock>
    </mt:Loop>
    <mt:SetVar name="urls">
    <mt:Loop name="customfield_entry_outerlink_url_loop">
      <mt:SetVarBlock name="urls" function="push"><mt:Var name="snippet_option"></mt:SetVarBlock>
    </mt:Loop>
    <mt:If name="titles">
      <mt:Loop name="titles">
        <mt:Var name="__counter__" op="--" setvar="index">
        <div class="customfield_entry_outerlink-wrap">
          <button type="button" class="js-outerlink__btn--remove">削除</button>
          <label for="customfield_entry_outerlink_title_<mt:Var name="index">" id="customfield_entry_outerlink_title_<mt:Var name="index">-label">リンクテキスト</label><br>
          <input name="customfield_entry_outerlink_title" id="customfield_entry_outerlink_title_<mt:Var name="index">" type="text" value="<mt:Var name="titles" index="$index" escape="html">">
          <label for="customfield_entry_outerlink_url_<mt:Var name="index">" id="customfield_entry_outerlink_url_<mt:Var name="index">-label">URL</label><br>
          <input name="customfield_entry_outerlink_url" id="customfield_entry_outerlink_url_<mt:Var name="index">" type="text" value="<mt:Var name="urls" index="$index" escape="html">">
        </div>
      </mt:Loop>
    <mt:Else>
      <div class="customfield_entry_outerlink-wrap">
        <button type="button" class="js-outerlink__btn--remove">削除</button>
        <label for="customfield_entry_outerlink_title_0" id="customfield_entry_outerlink_title_0-label">リンクテキスト</label><br>
        <input name="customfield_entry_outerlink_title" id="customfield_entry_outerlink_title_0" type="text" value="">
        <label for="customfield_entry_outerlink_url_0" id="customfield_entry_outerlink_url_0-label">URL</label><br>
        <input name="customfield_entry_outerlink_url" id="customfield_entry_outerlink_url_0" type="text" value="">
      </div>
    </mt:If>
  </mt:LocalVars>
</div>

<p style="margin: 0; text-align: right;"><button type="button" class="js-outerlink__btn--add">追加する</button></p>

<style>
.customfield_entry_outerlink-wrap {
  overflow: hidden;
  margin-bottom: 10px;
  padding: 10px;
  border: 1px solid #c0c6c9;
  background-color: #fff;
  border-radius: 3px;
  line-height: 1.5;
}
.js-outerlink__btn--remove {
  float: right;
  margin-bottom: 2px;
}
.customfield_entry_outerlink-wrap input[type="text"] {
  box-sizing: border-box;
  width: 100%;
}
</style>

<script>
;(function($){
  const createElement = function (options) {
    const index  = options.index || 0;
    const labels = options.labels || {};
    const values = options.values || {};

    const wrap = document.createElement('div');
    if (options.wrap_class) wrap.setAttribute('class', options.wrap_class);
    const btn = document.createElement('button');
    btn.textContent = '削除';
    btn.setAttribute('type', 'button');
    btn.setAttribute('class', 'js-outerlink__btn--remove');
    wrap.appendChild(btn);

    ['title', 'url'].forEach(function(value){
      const name = 'customfield_entry_outerlink_' + value;
      // create label
      if (labels[value]) {
        const label = document.createElement('label');
        label.textContent = labels[value];
        label.setAttribute('for', name + '_' + index);
        label.setAttribute('id', name + '_' + index + '-label');
        wrap.appendChild(label);
        wrap.appendChild(document.createElement('br'));
      }
      // create input
      const input = document.createElement('input');
      input.setAttribute('name', name);
      input.setAttribute('type', 'text');
      input.setAttribute('id', name + '_' + index);
      input.setAttribute('class', 'text');
      if (values[value]) input.setAttribute('value', values[value]);
      wrap.appendChild(input);
    });

    const e = document.createDocumentFragment();
    e.appendChild(wrap);

    return e;
  };

  $(function(){
    const $content = $('.customfield_entry_outerlink-content');
    const item_class = 'customfield_entry_outerlink-wrap';
    let index = $content.find('.' + item_class).length || 0;
    // add unit
    $(document).on('click', '.js-outerlink__btn--add', function(event){
      event.preventDefault();
      let element = createElement({
        index: ++index,
        labels: { title: 'リンクテキスト', url: 'URL' },
        wrap_class: item_class
      });
      if (element) {
        $content.append(element);
      }
    });
    // remove unit
    $(document).on('click', '.js-outerlink__btn--remove', function(event){
      event.preventDefault();
      if (window.confirm('削除しますか?')) {
        $(this).parent().remove();
      }
    });
  });
})(jQuery);
</script>
ステップ 3. フロント用のテンプレートモジュールを作成
同名のオプションに格納されたデータは、カスタムフィールドのタグに Vars を追加するとループ処理で取り出す事が可能です。
ユーザーガイドには次のように記載されています。
このケースでタグ名が
MTEntrySnippet、オプションが foo の場合、下記のようにテンプレートを記述します。
- テンプレート
- コンテキスト (MTVar) にセットされる値
『PowerCMS ユーザーガイド』(PDF) より
関連リンク テンプレートモジュール
今回は「リンクテキスト ( customfield_entry_outerlink_title ) 」と「リンク URL ( customfield_entry_outerlink_url ) 」をループで取り出します。
| テンプレート名 | 関連リンク |
|---|
<mt:Ignore>** 関連リンク **</mt:Ignore>
<mt:LocalVars>
  <mt:SetVar name="titles" />
  <mt:SetVar name="urls" />
  <mt:entry_outerlinkVars key="customfield_entry_outerlink_title">
    <mt:SetVarBlock name="titles" function="push"><mt:Var name="__value__" /></mt:SetVarBlock>
  </mt:entry_outerlinkVars>
  <mt:entry_outerlinkVars key="customfield_entry_outerlink_url">
    <mt:SetVarBlock name="urls" function="push"><mt:Var name="__value__" /></mt:SetVarBlock>
  </mt:entry_outerlinkVars>
  <mt:If name="titles">
    <mt:SetVar name="list" />
    <mt:Loop name="titles">
      <mt:If name="__value__">
        <mt:Var name="__counter__" op="--" setvar="index" />
        <mt:If name="urls" index="$index">
          <mt:SetVarBlock name="list" function="push"><a href="<mt:Var name="urls" index="$index" escape="html" />" class="link-outside" target="_blank"><mt:Var name="__value__" escape="html" /></a>(別ウィンドウが開きます)</mt:SetVarBlock>
        </mt:If>
      </mt:If>
    </mt:Loop>
    <mt:Loop name="list">
      <mt:If name="__first__">
        <h3 id="relation_link">関連リンク</h3>
        <ul>
      </mt:If>
          <li><mt:Var name="__value__" /></li>
      <mt:If name="__last__">
        </ul>
      </mt:If>
    </mt:Loop>
  </mt:If>
</mt:LocalVars>
ステップ 4. 記事アーカイブテンプレートに作成したテンプレートモジュールをインクルード
あとは記事アーカイブに作成したフロント用のテンプレートモジュール『関連リンク』をインクルードして完成です。
<mt:Include module="関連リンク" />
おわりに
スニペットフィールドは工夫次第で様々な入力項目を作成する事が可能です。ぜひご活用ください。
関連リンク
- スニペットフィールドを使って複数のカスタムフィールドを整理する
- スニペットフィールドでアイテムを登録する
- スニペットフィールドとカスタムオブジェクトによる入力欄セット追加UIのご紹介
- リッチテキストエディタが選択可能なカスタムフィールド(スニペットフィールド)を作成する
- スニペッドフィールドを使用したカラーピッカー
- スニペッドフィールドを使用したドラッグ&ドロップインターフェイス
- スニペット・カスタムフィールドでカスタムフィールドをタブグループにまとめる
- スニペット・カスタムフィールドでアイテム選択ダイアログを使用する


コメントを投稿する